Belvedere Waistcoat Sew-Along: Day 5 - Cut out your fabric
It's time to cut out our fabric! Here are my materials for the two Belvedere Waistcoats that I will be making. I'm creating Variation 1 without any alterations for my Granddad to wear on a cruise next Fall. It will look so nice with his navy blue suit!

I'll be using this 100% wool suiting remnant that I bought from my favorite sewing store in Victoria, B.C. - The Makehouse. I think the soft grey with white pinstripes will pair perfectly with the materials from our Belvedere Waistcoat Supplies Kit. The second waistcoat (that I will be sewing is for myself) will be Variation 2 paired with many of the the customisation that we discussed this week! This remnant is a very thick wool which I also purchased from The Makehouse. I will be trying out a few tailoring techniques using the new tailoring supplies that we have in our shop: striped Bemberg lining, wool canvas stabilizer and hair canvas.

I've photographed a number of tips as I cut out Variation 1:

Tip #1: Make sure that your pattern grainline is perfectly aligned to the grainline of your fabric. Don't just eyeball it! Measure from one end of the grainline to the selvedge of your fabric.

Now move your measuring tape to the other end of the grainline to check to see if you have the same measurement. Adjust your pattern piece until you do!

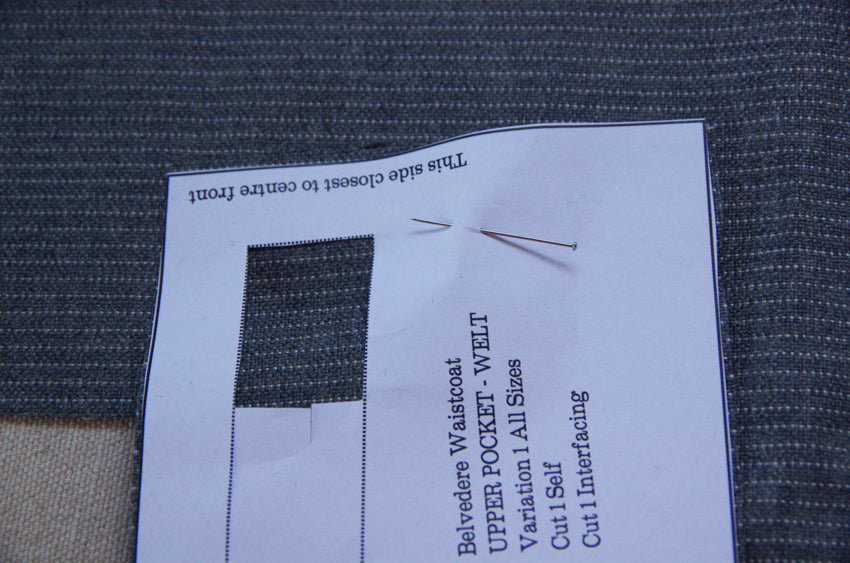
Tip #2: If you are adding welt pockets to your waistcoat and are working with a striped or patterned material you will need to pattern match your welt pieces. To do so, I like to cut out the edge of the welt placement markings on the waistcoat Front.

I can see that a white stripe is lined up with the left edge of the window.

Now cut out the corresponding window in the welt pattern piece (this is the side marked "This side closest to centre front." I ensured that the right edge of the welt was aligned with a white pin stripe.
After you cut out your welt pieces keep them pinned to the paper pattern piece. Since most wools do not have an obvious wrong side it can be very easy to lose which direction the welt should go! I keep my pieces pinned until the moment that I sew them to the waistcoat front.

Tip #3: When working with moderately slippery fabrics such as the paisley acetate lining that I am using for my waistcoat back I like to fold the lining in half with selvedges together (as per usual) and then press the fold VERY crisply. This makes the two layers of lining far less likely to become misaligned.

Above you can see the layout that I used when cutting a contrast waistcoat back (instead of using the same material that I used for the lining. I managed to slip the pocket linings on to this piece too and had loads of material to spare.

Tip #4: When working with VERY slippery fabrics like Bemberg lining I find pins to be my best friend. I pin the pattern piece to the lining material thoroughly and I also pin around the pattern piece. This second set of pins really helps to prevent the fabric from twisting as you cut. Many people use rotary cutters to cut slippery fabrics like this but, despite the fact that I bought a huge mat and good blade as part of my required materials at fashion school I have never really got the hang of using them.

When cutting with scissors you may notice that, despite your best efforts, the fabric just refuses to take the shape of the pattern piece! When cutting a lining it is important to be very accurate. You can see that I have cut approximately 2 mm too wide on my neckline in the photo above. Make sure to re-trim any accesses like this or you will likely notice that your lining seems baggy and prone to peeking out at the neckline and armholes. If anything it is better to cut your lining slightly too small. Here I have re-trimmed this problem area:

Tip #6: There is a good chance you will need far less interfacing than our instruction booklet recommends! We always create our interfacing cutting layouts for 20" wide interfacing since a number of interfacing brands are actually this narrow. The cotton interfacing that we include in the Belvedere Waistcoat Supplies Kit and stock by the half metre in our shop is 60" wide. I only needed 0.67 m for this size large waistcoat.

I hope you have a nice weekend! My next post on Monday will be all about interfacing - my Granddad's waistcoat will be fused as per our instruction booklet and my waistcoat will involve a bit of padstitching. See you then!
